🚀 오라클 인스턴스 생성하기
안녕하세요! 오늘은 오라클 클라우드에서 인스턴스를 생성하는 방법을 알아볼게요. 인스턴스는 쉽게 말해 클라우드에 있는 하나의 컴퓨터라고 생각하시면 됩니다.
🖥️ OS 이미지 선택하기
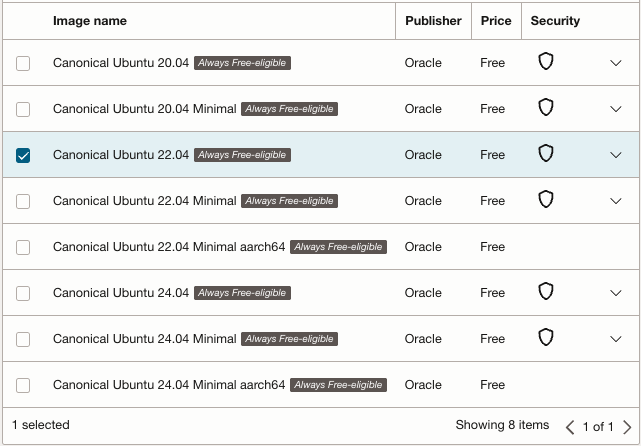
인스턴스를 만들 때 가장 먼저 결정해야 할 것은 어떤 운영체제(OS)를 사용할지입니다. 오라클에서는 일반 버전과 경량화된 미니멀 버전 두 가지를 제공하고 있어요.
💡 개인적인 팁: 저는 처음에 경량화 버전을 선택했다가 좀 고생했어요. 왜냐하면 개발할 때 필요한 기본 명령어들이 하나도 설치되어 있지 않았거든요. nano, vim, net, ufw, ping 같은 필수 패키지들을 일일이 설치해야 했습니다. 그래서 특별한 이유가 없다면 그냥 일반 버전을 추천해 드려요!
💰 Shape 선택하기
Shape는 인스턴스의 성능(CPU, 메모리 등)을 결정하는 요소입니다. 무료로 사용하고 싶다면 “Always Free” 표시가 있는 옵션을 선택하세요. 이렇게 하면 추가 비용 없이 계속 사용할 수 있어요.
🔑 SSH 키 관리
인스턴스 생성 과정에서 SSH 키를 받게 될 텐데, 공개 키와 개인 키 둘 다 잘 보관해 두세요! 나중에 인스턴스에 접속할 때 반드시 필요합니다. 이 키를 잃어버리면 인스턴스에 접속할 수 없게 될 수도 있으니 정말 중요해요.
🎉 인스턴스 생성
모든 설정을 마쳤다면 이제 “생성” 버튼을 눌러서 인스턴스를 만들면 됩니다. 몇 분 정도 기다리면 새로운 가상 머신이 준비될 거예요!
다음 글에서는 새로 만든 인스턴스에 접속하고 기본 설정하는 방법을 알아볼게요. 궁금한 점 있으시면 댓글로 물어봐 주세요! 😊
🚀 Creating Your Oracle Cloud Instance
Hey there! Today we’re going to create an instance in Oracle Cloud. Think of an instance as your own computer in the cloud.
🖥️ Choosing an OS Image
The first thing you’ll need to decide is which operating system (OS) to use. Oracle offers regular versions and lightweight minimal versions of their OS images.
💡 Personal tip: I initially tried the minimal version and ran into some challenges. None of the development commands I needed were available out of the box! Basic tools like nano, vim, net, ufw, and even ping weren’t installed. I had to add each package manually. Unless you have a specific reason, I’d recommend going with the regular version!
💰 Selecting a Shape
The shape determines your instance’s performance (CPU, memory, etc.). If you want to use the free tier, look for options labeled “Always Free.” These can be used indefinitely without any additional costs.
🔑 Managing SSH Keys
During the creation process, you’ll receive SSH keys. Make sure to save both the public and private keys securely! You’ll need these to connect to your instance later. Losing these keys could mean losing access to your instance, so they’re super important.
🎉 Creating the Instance
Once you’ve configured everything, just click the “Create” button to launch your instance. After a few minutes, your new virtual machine will be ready to use!
In my next post, I’ll show you how to connect to your new instance and configure the basic settings. Feel free to drop any questions in the comments! 😊