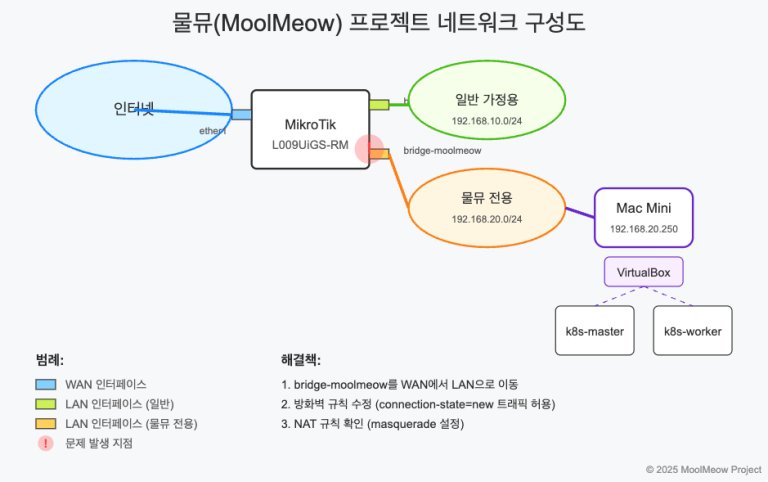
미크로틱 라우터에서 MAC 주소 기반 IP 고정하기 🛠️
안녕하세요, 여러분! 오늘은 미크로틱 라우터에서 특정 기기의 IP 주소를 고정하는 방법을 알아볼게요. 특히 홈랩이나 온프레미스 환경에서 쿠버네티스를 운영할 때 아주 유용한 팁이랍니다! 😊
왜 IP를 고정해야 할까요? 🤔
IP 주소를 고정해야 하는 이유는 여러 가지가 있지만, 제 경우엔 물뮤(MoolMeow) 프로젝트를 위해 필요했어요.
제가 온프레미스 환경에서 쿠버네티스 클러스터를 구축하면서 데이터베이스(MySQL, Redis)는 성능 최적화를 위해 호스트 머신에 직접 설치했거든요! 🖥️
이렇게 구성하면 두 가지 장점이 있어요:
- VM이나 컨테이너보다 네이티브 성능을 활용할 수 있어요 ⚡
- 스토리지 리소스를 더 효율적으로 사용할 수 있어요 💾
하지만 쿠버네티스 파드에서 이 데이터베이스에 접근하려면, 호스트의 IP가 항상 같아야 해요. 그래야 서비스 엔드포인트 설정이 깨지지 않으니까요! 🔄
미크로틱 라우터에서 IP 고정하기 🇰🇷
1. 라우터 관리 인터페이스 접속하기 🌐
먼저 미크로틱 라우터의 관리 페이지에 접속해야 해요. 보통은 웹 브라우저에서 192.168.88.1로 접속하면 돼요.
2. IP → DHCP Server 메뉴로 이동하기 📋
로그인 후, 왼쪽 메뉴에서 IP를 클릭하고 DHCP Server를 선택해주세요.
3. Leases 탭 선택하기 📝
DHCP Server 메뉴에서 Leases 탭을 클릭해주세요. 여기서 현재 DHCP로 할당된 모든 기기의 목록을 볼 수 있어요.
4. 고정할 기기 찾기 🔍
목록에서 IP를 고정하고 싶은 기기를 찾아보세요. 호스트명이나 MAC 주소로 식별할 수 있어요.
5. IP 고정하기 ⚓
찾은 기기를 더블클릭하거나 선택 후 오른쪽의 Action 버튼을 클릭하세요. 드롭다운 메뉴에서 “Make Static”을 선택하면 끝! 정말 쉽죠? 😄
만약 “Make Static” 옵션이 보이지 않는다면, 다음 단계를 따라해보세요:
- 새로운 Static 항목을 추가하기 위해 “+” 버튼을 클릭
- MAC 주소 필드에 기기의 MAC 주소 입력
- Address 필드에 원하는 고정 IP 주소 입력
- Client ID나 Comment 필드에 기기 이름 입력 (선택사항)
- Apply 또는 OK 버튼 클릭해서 저장
6. 설정 확인하기 ✅
설정이 완료된 후, 기기를 재부팅하거나 네트워크 연결을 재설정해보세요. 그런 다음 할당된 IP가 설정한 대로 나오는지 확인하면 됩니다!
쿠버네티스에서 활용하기 🚢
IP를 고정했다면, 쿠버네티스에서 외부 서비스로 연결하는 설정을 만들어볼까요?
kind: Endpoints
apiVersion: v1
metadata:
  name: external-database
  namespace: default
subsets:
  - addresses:
      - ip: 192.168.xxx.xxx  # 여기에 고정한 IP 주소 입력
    ports:
      - port: 3306
        name: mysql
---
kind: Service
apiVersion: v1
metadata:
  name: external-database
spec:
  ports:
  - port: 3306
    targetPort: 3306
    name: mysql
이렇게 설정하면 쿠버네티스 내부에서 external-database 서비스를 통해 호스트의 데이터베이스에 접근할 수 있어요! 🎉
마무리 생각 💭
미크로틱 라우터에서 고정 IP를 설정하는 것은 간단하지만 홈랩이나 온프레미스 인프라를 훨씬 더 견고하게 만들 수 있는 강력한 설정이에요!
물뮤 프로젝트처럼 데이터베이스를 많이 사용하는 애플리케이션의 경우, 고정 IP로 호스트에 데이터베이스 서비스를 유지하면 성능과 단순함 사이의 완벽한 균형을 제공해요. 쿠버네티스 파드는 이러한 서비스에 안정적으로 연결할 수 있고, 데이터베이스 작업에는 네이티브 성능의 이점을 얻을 수 있답니다!
즐거운 네트워킹 되세요! 🚀
Setting Up Static IP on MikroTik Router Based on MAC Address 🛠️
Hello everyone! Today we’ll learn how to set up a static IP address for specific devices on your MikroTik router. This is especially useful when running Kubernetes in a homelab or on-premises environment! 😊
Why Do We Need Static IPs? 🤔
There are several reasons to assign static IPs, but in my case, it was essential for my MoolMeow project.
I’m building a Kubernetes cluster in an on-premises environment, and for performance optimization, I installed databases (MySQL, Redis) directly on the host machine rather than containerizing them! 🖥️
This configuration offers two main advantages:
- We can utilize native performance instead of virtualized or containerized performance ⚡
- We can use storage resources more efficiently 💾
However, for Kubernetes pods to access these databases, the host’s IP must remain consistent. Otherwise, service endpoint configurations would break! 🔄
Setting Static IP on MikroTik Router 🇺🇸
1. Access Router Management Interface 🌐
First, access your MikroTik router’s management page. Typically, you can reach it by entering 192.168.88.1 in your web browser.
2. Navigate to IP → DHCP Server Menu 📋
After logging in, click on IP in the left menu and select DHCP Server.
3. Select the Leases Tab 📝
In the DHCP Server menu, click on the Leases tab. Here you’ll see a list of all devices currently assigned DHCP addresses.
4. Find the Device to Fix 🔍
Locate the device you want to assign a static IP to in the list. You can identify it by hostname or MAC address.
5. Make the IP Static ⚓
Double-click on the device or select it and click the Action button on the right. From the dropdown menu, select “Make Static” and you’re done! It’s that simple! 😄
If you don’t see the “Make Static” option, follow these steps:
- Click the “+” button to add a new Static entry
- Enter the device’s MAC address in the MAC address field
- Enter your desired static IP in the Address field
- Enter a device name in the Client ID or Comment field (optional)
- Click Apply or OK to save
6. Verify the Configuration ✅
After completing the setup, reboot your device or reset its network connection. Then check if the assigned IP matches your configuration!
Using with Kubernetes 🚢
Once you’ve set a static IP, you can create an external service configuration in Kubernetes:
kind: Endpoints
apiVersion: v1
metadata:
  name: external-database
  namespace: default
subsets:
  - addresses:
      - ip: 192.168.xxx.xxx  # Enter your fixed IP address here
    ports:
      - port: 3306
        name: mysql
---
kind: Service
apiVersion: v1
metadata:
  name: external-database
spec:
  ports:
  - port: 3306
    targetPort: 3306
    name: mysql
With this configuration, you can access the host’s databases from within Kubernetes using the external-database service! 🎉
Final Thoughts 💭
Setting up static IPs on your MikroTik router is a simple but powerful configuration that can make your homelab or on-premises infrastructure much more robust.
For database-intensive applications like my MoolMeow project, keeping database services on the host with fixed IPs offers the perfect balance between performance and simplicity. The Kubernetes pods can reliably connect to these services, and I get the benefit of native performance for my database operations!
Happy networking! 🚀

