
MikroTik 라우터로 홈서버 네트워크 구성하기 (문제해결 과정) 🌐
안녕하세요! 오늘은 제 홈서버 프로젝트 ‘물뮤(MoolMeow)’를 위한 네트워크 구성 중 겪었던 문제와 해결 과정을 공유해볼게요. 😊
🌟 왜 네트워크를 분리했나요?
먼저 왜 홈서버를 위한 네트워크를 분리하기로 했는지 설명드릴게요:
IP 충돌 방지: 기존 가정용 네트워크에는 이미 많은 기기들(스마트폰, TV, 노트북 등)이 연결되어 있고, DHCP로 IP가 할당되고 있어요. 제가 쿠버네티스에 고정 IP를 할당할 때 기존 기기와 충돌이 발생할 수 있습니다.
보안 강화: 홈서버는 외부 접근이 필요한 서비스를 호스팅할 예정이에요. 네트워크를 분리함으로써 필요한 포트만 개방하고 가정용 기기들은 보호할 수 있어요.
트래픽 관리: 서버 트래픽이 가정용 네트워크 성능에 영향을 주지 않도록 분리하는 것이 좋습니다.
독립적인 관리: 서버 네트워크에 방화벽 규칙이나 라우팅을 변경하더라도 가족들이 사용하는 일반 네트워크에는 영향이 없어요.
이런 이유로 MikroTik 라우터에 서버 전용 네트워크를 추가하기로 했습니다.
🧩 문제 상황
Mac Mini를 홈서버로 활용해 쿠버네티스 클러스터를 구축하려고 했는데, Mac Mini에서 인터넷 연결이 되지 않는 문제가 발생했어요! 가상머신은 생성됐지만 외부 패키지를 다운로드할 수 없어서 진행이 막혔죠. 😱
ping: cannot resolve google.com: Unknown host
🔍 네트워크 구성 살펴보기
1️⃣ 기본 네트워크 구조
우리 네트워크는 다음과 같이 구성되어 있었어요:
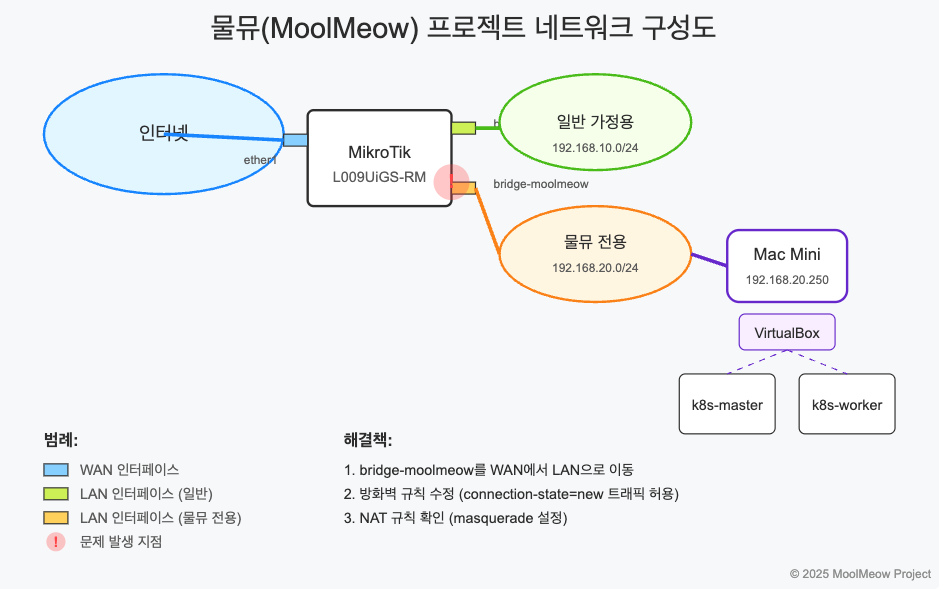
- MikroTik 라우터(모델: L009UiGS-RM)는
ether1을 통해 외부 인터넷에 연결 - 내부 네트워크는 두 개의 브릿지로 분리
bridge: 일반 가정용 기기들 연결 (192.168.10.0/24)bridge-moolmeow: Mac Mini 전용 (192.168.20.0/24)
- Mac Mini는 DHCP로 192.168.20.250 IP 할당받음
2️⃣ 라우팅 테이블 확인
먼저 라우팅 테이블을 확인해봤어요:
/ip route print
결과:
0 ADS  0.0.0.0/0 via 58.123.45.1 on ether1 [defconf]
1 ADC  192.168.10.0/24 via bridge
2 ADC  192.168.20.0/24 via bridge-moolmeow
기본 라우트가 제대로 설정되어 있네요! 🆗
3️⃣ 인터페이스 설정 확인
/interface print
결과:
0 ether1        ethernet  ether      1500 up
1 bridge        bridge    bridge     1500 up
2 bridge-moolmeow bridge    bridge     1500 up
4️⃣ 인터페이스 리스트 구성
/interface list member print
결과:
0 WAN ether1
1 LAN bridge
어라? bridge-moolmeow가 어느 리스트에도 포함되어 있지 않네요! 😮
🛠️ 문제 해결 시도
1️⃣ NAT 설정 확인
NAT(Network Address Translation) 설정을 확인해봤어요:
/ip firewall nat print
결과:
0 chain=srcnat action=masquerade out-interface-list=WAN
이건 괜찮아 보이네요. WAN 리스트의 인터페이스로 나가는 트래픽에 대해 NAT가 적용되고 있어요.
2️⃣ DNS 설정 확인
/ip dns print
결과:
servers: 8.8.8.8,1.1.1.1
allow-remote-requests: yes
DNS 서버도 제대로 설정되어 있어요! 👍
3️⃣ Mac Mini에서 테스트
Mac Mini에서 다음 명령어로 네트워크 상태를 확인했어요:
cat /etc/resolv.conf
ping 8.8.8.8
결과:
nameserver 192.168.20.1

ping: sendto: Network is unreachable
DNS는 라우터(192.168.20.1)로 설정되어 있지만, 패킷이 외부로 나가지 못하고 있어요! 😕
4️⃣ 추가 디버깅
라우터에 bridge-moolmeow를 WAN 리스트에 추가해봤어요:
/interface list member add list=WAN interface=bridge-moolmeow
그리고 Mac Mini에서 라우트를 수동으로 추가했어요:
sudo route add default 192.168.20.1
하지만 여전히 작동하지 않았어요. 😫
💡 핵심 문제 발견!
방화벽 규칙을 자세히 살펴봤어요:
/ip firewall filter print
결과 중에 이런 규칙이 있었어요:
;;; defconf: drop all from WAN not DSTNATed
chain=forward action=drop connection-state=new connection-nat-state=!dstnat in-interface-list=WAN
드디어 문제를 찾았어요! 🎉
이 규칙은 WAN 리스트의 인터페이스에서 들어오는 모든 새로운 연결을 차단하고 있었어요. 원래는 외부에서 들어오는 공격을 막기 위한 규칙인데, 문제는 제가 bridge-moolmeow를 WAN 리스트에 추가해버려서 Mac Mini에서 나가는 트래픽도 이 규칙에 걸려 차단된 것이었어요! 😅
✅ 해결 방법
두 가지 해결 방법이 있었어요:
bridge-moolmeow를 WAN 리스트에서 제거하고 LAN 리스트에 추가하기- 방화벽 규칙을 수정해서
bridge-moolmeow에서 들어오는 트래픽은 허용하기
저는 첫 번째 방법을 선택했어요:
/interface list member remove [find interface=bridge-moolmeow]
/interface list member add list=LAN interface=bridge-moolmeow
그리고 NAT 설정이 올바른지 확인했어요:
/ip firewall nat print
모든 것이 제대로 설정되었어요! 이제 Mac Mini에서 인터넷에 접속할 수 있게 되었답니다. 🎊
🔄 최종 네트워크 구성
ether1: 외부 인터넷 연결, WAN 리스트에 포함bridge: 일반 가정용 네트워크, LAN 리스트에 포함bridge-moolmeow: Mac Mini 전용 네트워크, LAN 리스트에 포함- NAT: LAN 리스트 → WAN 리스트로 나가는 트래픽에 masquerade 적용
- 방화벽: WAN 리스트에서 들어오는 새로운 연결은 차단 (기본 보안)
💭 배운 점
인터페이스 리스트의 중요성: MikroTik에서는 인터페이스를 논리적 그룹(WAN/LAN)으로 분류하고, 이를 기반으로 방화벽 규칙과 NAT를 적용해요.
방화벽 규칙 이해하기:
connection-state=new connection-nat-state=!dstnat같은 조건이 어떤 의미인지 제대로 이해하는 것이 중요해요.단계별 디버깅: 네트워크 문제는 라우팅 → NAT → DNS → 방화벽 순으로 체계적으로 확인하는 것이 효과적이에요.
MikroTik 라우터는 정말 강력하지만, 때로는 이렇게 작은 설정 하나가 전체 네트워크를 멈추게 할 수도 있어요. 차근차근 문제를 해결해나가는 과정이 재미있었답니다! 😄
Setting Up a Home Server Network with MikroTik Router (Troubleshooting Process) 🌐
Hello there! Today I’d like to share the network configuration challenges I faced while setting up my home server project ‘MoolMeow’ and how I resolved them. 😊
🌟 Why Create a Separate Network?
First, let me explain why I decided to create a separate network for my home server:
Preventing IP Conflicts: My existing home network already had many devices (smartphones, TVs, laptops, etc.) connected with DHCP-assigned IPs. When setting up Kubernetes with fixed IPs, there was a risk of IP conflicts with existing devices.
Enhanced Security: The home server would host services that might need external access. By separating the network, I could open only the necessary ports while keeping my home devices protected.
Traffic Management: Server traffic wouldn’t impact the performance of the regular home network.
Independent Administration: Changes to firewall rules or routing for the server network wouldn’t affect the regular network used by family members.
For these reasons, I decided to add a dedicated server network to my MikroTik router.
🧩 The Problem
I was trying to set up a Kubernetes cluster using my Mac Mini as a home server, but ran into a major issue: no internet connection from the Mac Mini! The virtual machines were created successfully, but I couldn’t download any external packages, which completely blocked my progress. 😱
ping: cannot resolve google.com: Unknown host
🔍 Examining the Network Configuration
1️⃣ Basic Network Structure
My network was configured as follows:
- MikroTik router (model: L009UiGS-RM) connected to the internet via
ether1 - Internal network divided into two bridges:
bridge: Regular home devices (192.168.10.0/24)bridge-moolmeow: Dedicated for Mac Mini (192.168.20.0/24)
- Mac Mini assigned IP 192.168.20.250 via DHCP
2️⃣ Checking the Routing Table
First, I checked the routing table:
/ip route print
Result:
0 ADS  0.0.0.0/0 via 58.123.45.1 on ether1 [defconf]
1 ADC  192.168.10.0/24 via bridge
2 ADC  192.168.20.0/24 via bridge-moolmeow
The default route looked properly configured! 🆗
3️⃣ Checking Interface Settings
/interface print
Result:
0 ether1        ethernet  ether      1500 up
1 bridge        bridge    bridge     1500 up
2 bridge-moolmeow bridge    bridge     1500 up
4️⃣ Checking Interface List Configuration
/interface list member print
Result:
0 WAN ether1
1 LAN bridge
Wait, bridge-moolmeow isn’t included in any list! 😮
🛠️ Troubleshooting Attempts
1️⃣ Checking NAT Settings
I checked the NAT (Network Address Translation) settings:
/ip firewall nat print
Result:
0 chain=srcnat action=masquerade out-interface-list=WAN
This looks fine. NAT is applied to traffic going out through interfaces in the WAN list.
2️⃣ Checking DNS Settings
/ip dns print
Result:
servers: 8.8.8.8,1.1.1.1
allow-remote-requests: yes
DNS servers are properly configured too! 👍
3️⃣ Testing from the Mac Mini
I checked the network status on the Mac Mini with these commands:
cat /etc/resolv.conf
ping 8.8.8.8
Result:
nameserver 192.168.20.1

ping: sendto: Network is unreachable
DNS is set to the router (192.168.20.1), but packets can’t reach the outside world! 😕
4️⃣ Additional Debugging
I added bridge-moolmeow to the WAN list on the router:
/interface list member add list=WAN interface=bridge-moolmeow
And manually added a route on the Mac Mini:
sudo route add default 192.168.20.1
But it still didn’t work. 😫
💡 Finding the Core Issue!
I examined the firewall rules more carefully:
/ip firewall filter print
Found this rule among the results:
;;; defconf: drop all from WAN not DSTNATed
chain=forward action=drop connection-state=new connection-nat-state=!dstnat in-interface-list=WAN
Finally found the issue! 🎉
This rule was blocking all new connections coming from interfaces in the WAN list. It was originally meant to block attacks from the outside, but the problem arose when I added bridge-moolmeow to the WAN list, causing traffic from the Mac Mini to be blocked by this rule! 😅
✅ The Solution
There were two possible solutions:
- Remove
bridge-moolmeowfrom the WAN list and add it to the LAN list - Modify the firewall rule to allow traffic from
bridge-moolmeow
I chose the first option:
/interface list member remove [find interface=bridge-moolmeow]
/interface list member add list=LAN interface=bridge-moolmeow
Then verified the NAT settings were correct:
/ip firewall nat print
Everything was properly configured! Now the Mac Mini could access the internet. 🎊
🔄 Final Network Configuration
ether1: Internet connection, included in WAN listbridge: Regular home network, included in LAN listbridge-moolmeow: Dedicated Mac Mini network, included in LAN list- NAT: masquerade applied to traffic going from LAN list → WAN list
- Firewall: New connections from WAN list are blocked (default security)
💭 Lessons Learned
Importance of Interface Lists: In MikroTik, interfaces are classified into logical groups (WAN/LAN), and firewall rules and NAT are applied based on these groups.
Understanding Firewall Rules: It’s crucial to understand conditions like
connection-state=new connection-nat-state=!dstnatand their implications.Methodical Debugging: Networking issues are best approached systematically, checking routing → NAT → DNS → firewall in sequence.
MikroTik routers are incredibly powerful, but sometimes a small setting like this can bring your entire network to a halt. The process of systematically solving the problem was quite interesting! 😄